Track Changes Panel
The Track Changes dynamically updates to keep a running list of all
edits to your chart. Once you finish editing your chart, you can easily
review all changes with management or Human Resources directly within
OrgPlus, or via a Microsoft Excel or Word report. To access the Track
Changes panel, click the View
tab and select Track Changes.
Note: The Track
Changes panel is only available to OrgPlus Premium users. To upgrade your
version of OrgPlus, please visit the OrgPlus Online Store.
From the Track Changes panel you can:
View all changes - new
hires, separations, transfers and other updates - made to a chart
Accept and reject changes
Generate and print reports
Overview of the Panel
The Track Changes panel has three main parts:
The Toolbar
The Track Changes toolbar has the following buttons:
Button |
Name |
Description |

|
Print Changes |
Sends
list of changes to the default printer. |

|
Print Preview |
Opens preview of printed changes. |

|
Generate Excel
Report |
Creates an Excel report. See Generating
Reports for more information. |

|
Generate PAN
Report |
Creates PAN report. See Generating
Reports for more information. |

|
Accept Changes |
Accepts changes made to chart. See Accepting
and Rejecting Changes for more information. |

|
Reject Changes |
Rejects changes made to chart. See Accepting
and Rejecting Changes for more information. |
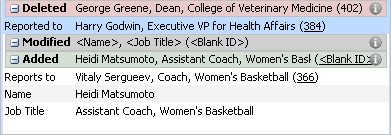
The Status Bar
The status bar enumerates the changes made to the chart.

In the above example, three total changes have been made:
One chart box was added
One chart box was deleted
No chart boxes were moved
One chart box was modified
The Main Pane
The main Track Changes pane lists in detail the changes made to your
chart.
The values set in the drop-down choices in the Identify
Fields dialog box determine what fields are used in the Track Changes
panel, and in the Excel and PAN reports when Name, Job Title, and Employee
ID are displayed.
Accepting
and Rejecting Changes
Changes made to your chart can be accepted or rejected, even after the
altered chart has been saved.
To accept a single change to a chart:
1 Click
to select the change in the Track Changes list.
2 Click
the Accept Changes button to view the options.
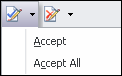
3 Select
Accept.
To accept all changes to a chart:
1 Click
the Accept Changes button to view the options.
2 Select
Accept All.
To reject a single change to a chart:
1 Click
to select the change in the Track Changes list.
2 Click
the Reject Changes button to view the options.
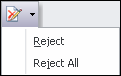
3 Select
Reject.
To Reject all changes to a chart:
1 Click
the Reject Changes button to view the options.
2 Select
Reject All.
Changes Backup
When accepting or rejecting all changes, you are presented with a warning
dialog:

Selecting "Create backup" and clicking OK
archives your chart to the Backups subfolder in the My Charts folder.
For information on accessing archived charts, see Opening
an Existing Chart.